Table of Contents
Introduction
If you are wondering – “SKP” stands for “Sketchbook Pro”.
One of the first steps to take when digital drawing is setting out the drawing page. I took some time with this mainly because it wasn’t the easiest to follow and required a little trial and error.
There are 3 ways to set the page on which you draw: canvas, image and page.
Sketchbook Pro Help
Some Basics
As a newbie, it is not easy to understand what each does and how they interact with each other in order to arrive at the point of working out what is best for the digital drawings. But some initial basic stuff:
– “PPI” – pixels per inch
– “DPI” – dots per inch
– PPI is for screen size and DPI is for printing. Both relate to how clear your image will be at different sizes.
– Sketchbook Pro seems to only works in pixels rather than dots which means you need to an additional step when looking to set your drawing to a desired DPI (see below).
There are two key questions that you need to ask yourself at the beginning of each drawing: size of my drawing and am I going to print it or keep it on screen?
The settings for canvas and image size are needed for answering those questions.
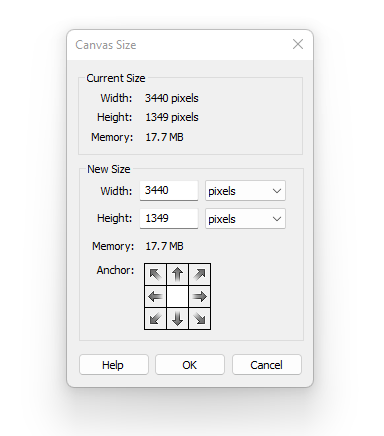
Canvas size dialogue box
Firstly you’ll note that “Image Size” actually comes before “Canvas Size” in SKP in the main menu bar. On assumption that some sort of user interaction was involved, that would suggest that image size is more important than canvas size. However, I’ve worked it in reverse.
Canvas size is the equivalent of your drawing page and it defaults to your screen size (in pixels) but you can set it your preference.
For me, canvas size is the first setting just because it is the most natural starting point.
I tend to think in terms of established paper sizes, A4, A5, A3 as mental visual guides.
The default setting is in pixels so I converted the A sizes into pixels – see here.
Anchor – in the Canvas dialogue box there is a section “Anchor” but I’m not sure what this does. Autodesk Sketchbook help suggests it is do with cropping.
With a very limited amount of testing, it seems that if crops your default size canvas (ie your screen size) when you reduce the canvas size: it moves the reduced canvas size to specified white square. So if you set it in the middle, the new reduced canvas size appears in the corner of your screen. It is ignored because it feels like a pointless setting as this stage.
Image Size dialogue box
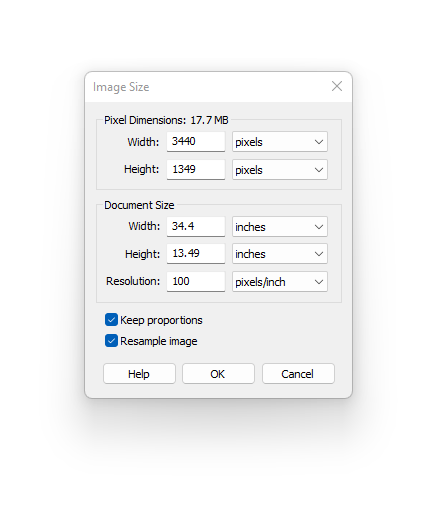
What is “image size” in Sketchbook Pro and how is this different from Canvas size?
The above question is what I found myself asking.
“Image size” – it isn’t entirely clear what this actually means as there seems to be an underlying assumption the user will know. Having worked through it, I am going to assume it is what your drawing will end up, ie the final image which you then use for websites and/or print.
I have read Sketchbook Pro Help’s notes and worked my way through the image size dialogue to try and understand. Even though I am a newbie and my own lack of experience and understanding may well be relevant, it wouldn’t surprise me if either the software has a bug or the Help notes are not accurate.
If my assumptions are correct then you need to change the image settings for a desired quality of your drawing which is important for physical printing.
Changing image size
There are three ways to change the image size:
- pixel dimensions which duplicates the canvas size
- document size width and height which again reflects the pixel and canvas size (though unhelpfully using different metrics)
- resolution: the pixels per inch
The tick boxes - "Keep proportions" and "Resample image"
In addition there are two tick or check boxes: “Keep Proportions” and “Resample Image” and require special mention as they are really confusing. I’ve worked through the three scenarios of boxes that are ticked or unticked.
SCENARIO ONE: – if you keep both boxes ticked (the default setting), then
- a) if you change the resolution, you will find that the pixel dimensions (and therefore the canvas) will change but the document size will not. I assume this means that your overall document remains the same but you get better quality ie more pixels per inch.
- b) if you change the document size (keeping the resolution the same) then the pixel dimensions will reduce meaning the canvas size reduces simply because it will look to maintain the resolution (pixel per inch). At this stage I’ve no idea why you would do this.
- c) if you change the pixel dimensions (ie the canvas size), then the document size changes as well and the resolution remains the same.
SCENARIO TWO: if you untick the “keep proportions” box (and the resample image remains ticked) then
- a) if you change the resolution, you will find the pixel dimensions (the canvas) will change but the document size will not. This seems to be the same as Scenario One (a) above. I assume this means that you will have greater density of pixels on the same document size.
- b) if you change the document size then the pixel dimensions (canvas size) will change reflect the document size; the resolution will remain the same which seems logical.
- c) If you change the pixel dimensions (the canvas size), then the document size changes as well but the resolution remains the same.
SCENARIO THREE: if you untick the “Resample image” box, this automatically greys out “keep proportions” tick box and the pixel dimensions greys out: this fixes the pixel dimensions (canvas size). I
- a) if you change the resolution, the document size
- b) if you change the document size then the pixel resolution changes accordingly.
I’ve no idea what “resample image” actually means or when you would untick this box but suspect that when I have some drawings then I can practise and update this section.
What is the relationship between image size and canvas size in Sketchbook Pro?
In Sketchbook Pro, canvas size is measured only in pixels as per your screen rather than pixel density per unit of measurement (ie inch). Image size seems to be when you want to increase the pixel density with a view to printing the drawing.
If you want a more pixel dense drawing for printing you need a big canvas for drawing, limit the document size and increase the pixel per inch.
Sketchbook Help provides the details here with an example but if you follow Sketchbook’s help then I’m not sure it actually works ie you don’t even get what their Help suggests in the link.
Appling the various steps around the tick boxes then, as an example, if you want 300dpi so you can print on A2 size then:
Step 1 – Canvas size dialogue box: set canvas size to 7020×4950 pixels (depending on whether you want it wide or tall).
Step 2 – Image size dialogue box:
- you have to untick “Resample image” this locks the pixel dimensions (and therefore the canvas size);
- now if you enter in 300 pixels per inch into the resolution, you will see the document size changes and this is the size of A2 paper in inches.
If you had left the boxes checked (as per Sketchbook Help), then if you changed the resolution, all the other sizes would have changed as well. The only way to get an A2 size with high density is to untick ‘Resample image’ box.
What happens when I import an image into a canvas on Sketchbook Pro?
Q: What happens when I import an image into a canvas on Sketchbook Pro?
Any reference photo that is imported will be:
- automatically inserted as a new layer
- the cropping tool will automatically open
- the canvas settings will be preserved
- if canvas is smaller than the image then only part of the reference photo will show.
Using the cropping tool, you can change the photo size to match the canvas.
Page setup/size
In “File – Page Set-up”
As far as I can tell, this is relevant to printing rather than drawing. I set a canvas size of A5, drew something and then printed it on A4. It came out the size of A4 (rather than A5) with margins.
Therefore, you should set this as close as possible to your canvas/document size. Or use external printers who may understand this a lot better!
For me this is being parked until it becomes an issue ie I need to print it.
My practice drawing settings
At this point all practise drawings will stay digital and they don’t need to be too big unless the reference image requires it:
- page size A4
- canvas size: 1000×1000 to 3000×3000 pixels depending on the reference image
- pixel resolution: 100
This does mean that I only really change one setting in the Canvas size box.
For images purely on websites, 100 PPI is apparently considered high and 72 PPI works.